Thursday 5 July 2012

Shooting two pretty girls

Soul in the City

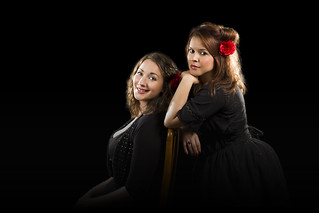
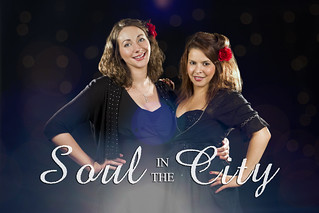
Soul in the City are a covers duo that needed some new shots to go with their new website showing that they're classy, professional and approachable.

To keep things looking as continuous as possible we orchestrated things so that we would shoot these portraits in the afternoon straight after they had finished shooting their new demo video in the morning at a hotel just around the corner. This worked out really well and you can see there is a strong visual aesthetic running through their new site over at SoulintheCitymusic.com

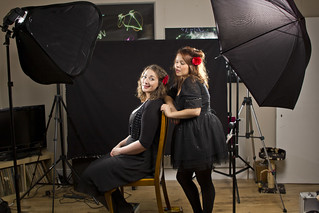
Once they had decided on their new look we talked about how the photos would look and I knew we would be shooting against black. Usually I stick with the standard two light set up of something soft (umbrella or soft-box) off to one side and above and a hard back light opposite the diffused light. I suppose I've been vaguely concerned with keeping things looking natural but end up with people bleeding into the black back-ground. So on this shoot I joined the crowd and lit everything!

Soul in the City portrait

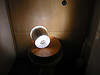
I used one Sigma 530 Super (now replaced with the much cheaper 610 Super) and three Nikon SB26 flashes and went with soft light from a 24" soft-box and 45" umbrella) on their faces and bare hard light behind them to separate them from the black. The only problem I had was with the flags in the two rim/hair/separation lights. I attached flags to the back of them to stop them spilling onto the black back-drop and washing it out to grey and flags to the front to stop them flaring into the lens. This all worked great apart from I ended up with just a very narrow strip of light hitting the back/side of each girl. I couldn't quite work out how to get around this. I pulled the flags back so that they were as shallow as 2cm or so with no luck. Perhaps they should have been further away from the girls?

Soul in the City

Whilst shooting I set up a timelapse on my spare camera body and an 18-55m kit lens so you can see exactly how we set everything up. Enjoy!

Read more...

Sunday 20 May 2012

Alien gameboy heads photo shoot

D NOVA 1

I did a really fun shoot with a band called D NOVA at the start of May. We came up with a nifty story to base the pictures around including an alien spaceship (complete with smoke and search light) and pulled it all off with a few small flashes and a tin of Pringles.

The story was this:
the gameboy heads partied a bit too hard after a gig and Dan Nova (the front man) was beside himself with what to do with them (the first picture, above). Then he tried to drag them into shape, then lastly the tables turned as the two gameboy heads tied him up on a roof-top and held him in place whilst an 8-bit alien space ship prepared to beam him up!

As you can see in the first image (at the top of the post), I went for a dark alley with a pink glow from a club, a street light illuminating the sick and a separate light on Dan Nova.

We shot this at about 7pm with lots of light to work in so I began with a shutter speed of 1/200 (the maximum speed with a flash on a Canon 550D) to keep it dark. As I only had one pair of Pocket Wizard plus IIs I had to start with my brightest light and trigger the rest of them in optical slave mode from this light. In this shot the brightest was the back light, a Nikon SB26 (in fact, all my flashes are Nikon SB26s, about £45 on ebay and really good!) gelled pink and sat on the floor facing up and to the left wall. Although it would have usually made more sense to next sort out the light on Dan Nova, this composition is based around the sick on the floor so I moved onto illuminating that as if it were under a street light so everyone could get into position relative to this sick. I had made a snoot especially for this shoot from a tin of Pringles suspended on the end of a 3 metre pole:

Spot light test 1

The 'snoot on a pole' idea actually came about as a way to simulate the alien space ship search light used in the third shot and it just so happened to work nicely resting against a wall for this first shot. Next I lit Dan Nova with another SB26 through a 33" umbrella. I didn't want the light to fall much further than his face so for this reason my assistant held the umbrella collapsed and right in his face (stood on the wall you see bottom right).

As I had eliminated the ambient light with the 1/200 shutter speed the gameboy faces were now completely silhouetted. Another SB26 on the floor camera left on the lowest setting 1/64 took care of them and the whole shot came together!

Here's a little behind the scenes of just the first shot:

The second shot was fairly simple: umbrella into Dan Nova's face from above camera right, a flash on the floor gelled pink between Dan Nova and the first gameboy and a backlight on the floor behind the female gameboy.

D NOVA 2

The last shot came together really well! Again we used the Pringle can snoot on the 3 metre pole, this time to represent the search light from the alien space ship. A 33" umbrella was held near Dan Nova's face for a bit of fill and another flash was on the floor just camera right to give a bit of a rim/separation light on the female gameboy. There was actually another flash on the floor on the left to give separation on the male gameboy but there were lots of drunk tourists around taking in the skyline whilst we shot this and someone must have got in it's way or something. All the smoke was burning incense sticks shot in my flat against a black towel and comped in.

D NOVA 3 Read more...

Friday 18 May 2012

Car journey timelapse

I had a try at making a timelapse of a car journey whilst driving from Brighton to London.

My first attempt during the day was awful. There was too much light to use a long exposure so the timelapse was way too jerky, cars just flicked around all over the place. I also found it almost impossible to mount the camera anywhere so had it moving through the journey which I tried to cover with some random editing, holding on frames here and there. This basically looked crap.

On the second attempt from Brighton to Hemel I put the camera on the ledge behind the back seats at 24mm and tried to get an exposure that was just under the length of the interval on the intervalometer. I think I went for a 2 second exposure and a 3 second interval. The look was still not what I was really after, if I am called to do another journey timelapse I'll investigate some sort of sturdier mounting options. Perhaps an 18mm lens would have been better too?

The music in the video is a cover I recorded of one of my favourite Michael Jackson songs, Speed Demon I love it! It was a great excuse to whip out some slap bass and yes, I did have to slow down the chorus! Read more...

Tuesday 15 November 2011

Event Photography

Freaky Electronique dancer
For almost two years I've been the official photographer for a club night called Freaky Electronique, run by my good friends Ash Wiggins and Jon Pigrem. As it's turned out, the club and my event photography abilities have grown in parallel at a similar rate. What was at first quite a difficult task has slowly evolved to become an opportunity to explore seat-of-your-pants portrait shooting and dealing with and keeping drunk people happy.

Sure enough it was a process of trial and error. Lot's of error.

IMG_1429_edit_wm

My first hurdle was getting that slow shutter look (where all the lights in the background make lines) with the subject nicely illuminated and sharp in front of said lines. This part is actually nice and simple (room depending): 8th of a second shutter with the flash firing on the 'second curtain' (at the end of the shutter duration), ISO to taste. Possibly the handiest tip I've picked up is from the awesome flash photography blog of David Hobby, which is to treat your shutter speed as a way to control the light in the room and your aperture to control the impact of your flash. The ISO seems to end up affecting a bit of both as an overall exposure control (though not in RAW format).

This slow-shutter approach does need some kind of lights in the background to look good though though and obviously won't work outside in the sun.

IMG_2877_wm

Eventually I noticed the look could be improved/exaggerated by simply wiggling the camera during the exposure. Again, this is limited if there are no lights in the back ground to turn into squigles, but it helps make the whole picture a bit more dramatic.

IMG_0261_edit

Once I had this basic set up sorted I found it difficult to overcome the horrible orange look of most venues with little and/or rubbish lighting. For months I struggled with this and tried to get the blue bleached out look by bringing down the saturation of the red channel in Photoshop. Though a lot of these pictures looked quite good, they did seem quite flat and didn't have the 'punch' of bright vibrant colours that a night club should have. After a while some people even started telling me they thought they looked dead in previous pictures!

IMG_0095_edit_wm

Unfortunately I didn't overcome this with any one step, more so it was a gradual process of adhering to the create, share, feedback, review flow chart with particular attention paid to the last point: review. As I was still shooting in JPG the colours in each photo at the time of shooting were kept and difficult to edit effectively. I tried using a 'portrait' colour profile on my Canon 550D which helped get rid of some of the red in peoples faces. I also moved the white balance centre over to the blue side. These two things helped a bit but people were now quite yellow.

IMG_2442_edit_wm
Tribal Riot

Probably the most effective step I took was to turn up my flash to overpower the venue lighting almost completely on peoples faces. So as to keep people from being bleached out I just closed the aperture down a bit so I ended up around 1/8 on my flash and f/9 or f/11. With this set up peoples faces were almost entirely lit by my flash with a nice colour and the horrible venue lights made up the back ground.

Ash Wiggins
IMG_7092_edit

For some reason I didn't really notice until I shot in a venue with much nicer lighting how the quality/look of the light from my flash not only changes with what power setting it is on but also changes depending on how close I am to the subject. I suppose it is something to do with it bouncing off of my bounce card in a particular shape that is lost with every extra inch that the light travels before hitting the subject. To be clear, I don't just mean that the light from my flash diminished as I move further away from a subject, it actually changes the way it looks on their face, when I'm closer it looks better, even if they are illuminated to the same degree.

So my current set up is to shoot with the flash quite powerful, the aperture quite small, the shutter varying from a 3rd of a second to a second and a half (depending on how much light and movement there is in the room), the ISO at 400 or 800 for monitoring purposes, as close as I can get to peoples faces and in RAW format.

Dirty Dice at Ministry of Sound
Dancer at Ministry of Sound

I've found people are more friendly the bigger club and the more official I look. I wear a t-shirt with the club name on it and a big picture of a camera on the back which really helps distinguish me from an over-zealous party goer. It's also handy having a big SLR with a battery grip, flash and bounce card. I'm yet to make a DIY ring flash but (as long as it doesn't look to crappy) this will probably also put people at ease in approaching me for their photo. Usually I can get one or two pictures of someone before they're ready to move on and continue enjoying their night but about once per event I will get someone who will never be happy with their picture and keeps asking for another and insisting that I delete all the previous ones. I've not yet worked out a perfect way to deal with these people, but insisting that this 7th photo really is the last one and just leaving it at that seems to work OK for now.

Drinkers at Ministry of Sound
IMG_2719_edit (Custom)
IMG_2778_edit (Custom)

I like the idea that some people who perhaps don't have any nerdy friends that are into photography might come along to Freaky Electronique, have their portrait taken and it turn out to be the nicest/flattering/most fun picture of them to date. With this in mind I don't skimp on the teeth whitening, spot removal and general beauty retouching in Photoshop and it has become quite standard for me to see a handful of people after each event with my pictures as their profile pictures which makes me happy and keep to stay up all night taking pictures yet again.
Read more...

Saturday 29 October 2011

Phantoms in the Brain

Day 57 - Thursday 26th February

I just finished reading Phantoms in the Brain: Human Nature and the Architecture of the Mind by Ramachandran after coming across a few good quotes from it in Consciousness: A Very Short Introduction. Ramachandran seems to be in the same circles as Oliver Sacks and the book very much reads like a more in-depth version of The Man Who Mistook His Wife for a Hat, almost a follow up to it, perhaps with a bit less sensationalism, depending on your take of The Man Who Mistook His Wife for a Hat.


It jumped straight into a full on explanation of phantom limbs and his experience of the whole strange topic. Although I at first felt like this was more than I ever wanted to know about phantom limbs there were some amazingly simple 'cures' for a phantom arm for example, that sounded like they should have been discovered two hundred years ago, yet were from the late 80s. He talked about patients suffering from a phantom lower arm where their hand was permanently stuck in a clenched fist position, so much so that the phantom muscles in their phantom arm ache chronically and the phantom finger-nails in the phantom fingers dig into their phantom palm causing excruciating, incurable pain.

One way he found of relieving this pain was to construct a simple black box with two holes on the front and a removable lid. The patient inserts their two arms, both fists clenched, into the box (one arm is a phantom) then upon removing the lid of the box the patient actually sees two reel fists in the box via a mirror in the middle of the box, reflecting the real arm in the position of the phantom. When ready, the patient un-clenches both fists and for the first time (via their own visual feedback system) is able to feel the relief of the phantom hand relaxing and un-clenching.


This hasn't turned out to be a cure for phantom limbs but more of a hint to their nature and whereabouts in the brain and within the human condition. Ramamchandran lightheartedly mentions how patients have been dispatched with magic black boxes of their own to work with for 20 minutes a day to relieve the discomfort of a phantom limb.

The main reason I wanted to read the book was for its insights into our consciousness and our ideas of self. This was touched on quite a bit in the first chapter in relation to perfectly sane people feeling like they can reach out and pick up an object within arms length, even though they are completely aware of having no arms. There were interesting points raised about our visual feedback system and how easy it is to distort our image of our physical self by closing our eyes and engaging in simple exercises.

The more interesting points were mentioned in what I felt was the best chapter called 'The Unbearable likeness of Being'. It was centred around a case of Capgras' delusion where the patient insisted that his parents were in fact impostors that looked just like them but lacked the particular 'isms' of his real parents. There were extra twists where the patient would accept them as his own parents whilst talking to them over the phone, but not face to face. Through this case and Ramachandra's experiments with the patient all kinds of links between our various sensory input systems were uncovered and illustrated in their use in making sense of the world around us (when not suffering from a neurological disorder).

Throughout the book Ramachandran laid down interesting ideas about how we construct our own reality and how we rely on particular functions to do so (using interesting examples of how we fill in our blind spot because we can't function with holes throughout every scene we look at "it's clear that the mind, like nature, abhors a vacuum and will apparently supply whatever information is required to complete the scene" (p.89)).

Although not as focused on consciousness as I might have liked Phantoms in the Brain is a good read, has given me new ideas and understandings and I will be recommending it to my Oliver Sacks fan friends.

I think my favourite quote from the book is
"Most organisms evolve to become more and more specialized as they take up new environmental niches, be it a longer neck for the giraffe or sonar for the bat. Humans, on the other hand, have evolved an organ, a brain, that gives us the capacity to evade specialization. We can colonize the Arctic without evolving a fur coat over millions of years like the polar bear because can go kill one, take its coat and drape it on ourselves. And then we can give it to our children and grand children." (p.190)


Read more...

Sunday 2 October 2011

Homemade intervalometer


Back at the start of 2008 when I made my first explorations into using a series of photos in a timeline to compile a video either as stop motion or timelapse, it was quite tricky to get hold of an intervalometer for less than $200. On top of that, I was using a Panasonic Lumix point and shoot with no remote triggering option so was firmly stuck pushing the button by hand anyway.

This didn't stop me from making timelapse videos, they were just shakey from all the interruptions of pushing the button by hand and the speed of the motion would change and drift as my fingers froze over time and I found it almost impossible to maintain a regular interval between pictures.

Fast forward to the start of 2009 when I acquired a Canon 450D and my options became many for accurate interval shooting to create better timelapse videos.

Another huge benefit to using a digital-SLR camera is that you can leave it in full manual mode (everything: ISO, shutter speed, aperture, focus, no image stabalisation) so the look of the finished video remains consistent and flicker free.

As mentioned above, at the start of 2009 intervalometers were very expensive and only came with connections for the more pricey Canon cameras. So initially I was limited to hooking my 450D up to my laptop and controlling it via the included Canon EOS utilities software. This method is really effective and gives you a nice option of saving your pictures to either the camera's SD card and/or your computer hard drive.

I made a few timelapses using this camera tethered to laptop method and got good results but there are quite a few limitations, the most obvious being that you have to have a laptop with your camera. Another consideration is the minimum interval which the Canon EOS utilities software can get down to; only 5 seconds. I'm not sure why they've imposed this, Shirly it would be easy to start at 1 second and offer 0.1 second increments? It would be great if they could also include some kind of ramping option in the interval and remote control of the shutter speed in 0.1 second increments (again, this must be fairly easy to integrate into the software?). You could start your timelapse with a shutter speed of 1/400 while the sun is shining, move down to 1/50 as the sun sets, 1/5 just after and eventually end up at 30 second shutter speeds while the stars are out.

The only intervalometer I know of that offers this kind of control is the Little Bramper which seems to get awesome results. Again, there are limitations. It's expensive, it needs an adapter to work with a camera using a micro-jack connection for it's trigger release (like the 450D) and it uses a fairly basic analogue approach, open to all sorts of interferences. To use the little bramper you must put your camera into bulb mode and the little bramper does the rest. This means that the accuracy of the shutter speed and ramping is not just down to the intervalometer but also the ability of your camera to respond instantly to it's shutter release trigger. Because of this the little bramper is reported to work better with some Canon body's than others.

Anyway, I digress. To be able to make timelapses with ease out in the field I needed my own intervalometer and leave the laptop at home. After much research I decided to build one using an adjustable timer circuit. My soldering skills are rubbish but I managed to get the whole thing together in an afternoon (should probably only take 30 minutes), the instructions were pretty shabby and the relay in the picture on the packaging is back to front.

Day 87 - Saturday 27th March

Once you've built the timer kit the only way of connecting it to anything is to stick some wires in it's two relays. You can think of these as gates, one relay lets current pass on the click, the other relay stops current from passing on the click. You want to hook your micro-jack cable up to the first relay. I used a regular mini-jack to attach to the timer kit then a mini-jack to micro-jack adapter to plug into the camera to keep things modular and flexible. This means I have the option to wire up other triggering gadgets in the future and can use the much more accessible mini-jack cable salvaged from an old pair of headphones for example.

DIY Intervelometer 2

Using my DIY intervalometer out and about was great! As the circuit spends most of the time doing almost nothing the batteries last for ages, I mean like 2 weeks of use 24 hours a day. Whilst out on the side of Arthur's Seat, Edinburgh, in the cold I came across my first stumbling block. The timer kit is controlled by two tiny variable resisters, one for the interval and another for the shutter speed (if you're in bulb mode). As these are analogue they are open to interference from temperature (among other things) and so the colder they get, the slower the interval. I was fiddling about with it for ages up the side of the mountain/hill with the camera firing off shots at all kinds of speeds (in the above video Edinburgh you can see the clouds change speed in the shots from the very highest bits of the mountain/hill).

Eventually I (my Dad) figured out that this was being caused by temperature and the easiest way to get around it was to keep the intervalometer in my pocket to keep it warm. Obviously not the best method but it worked!


Read more...

Friday 4 March 2011

A public diary

Day 46 - Sunday 15th February
I've never kept a proper personal diary but upon receiving a Canon 450D for Christmas 2008 I decided to do a '365', attempting to take some kind of self portrait every day for 365 days. As I would be uploading a photo to flickr each day that was specifically tied to that day I thought I may as well write a little bit of text about that day to go with each picture, so soon enough the whole thing had turned into a kind of photo diary of the year 2009, hosted on flickr.

My usual practice is to make any personal pictures private when uploading them to flickr as I can't see why anyone outside of my friends and family would find them interesting. But much like taking the plunge in uploading my unresearched ideas and doings on this blog, I decided to make a good few of the pictures public and with that, any personal text that might go with them.

As I expected, it was a strange feeling to put up online any thing remotely personal and to my surprise, I very quickly (like, by February!) ran out of ways to photograph myself other than looking at the camera like a vain teenager. I tried not to get too worked up about how good or bad the pictures were looking or about how many days I had missed a photo (I think in the end I took a photo 307 days out of the 365).

A little further into the year I really started to notice the benefits of the diary side of the project (both through text and image). There were loads of things from just a few months previous that I'd completely forgotten about, little details mentioned in the text that may have seemed trivial at the time.

Of course I couldn't resist making a book out of it using the fantastic Blurb.com.
IMG_3721_edit

Seeing the whole collection together in print form really gives it a context and lets me revel in nostalgia over moments otherwise forgotten. I particularly like any text that referred to someone met that day or very recently as "Dan's girlfriend" or "Jedd the singer", but who later became my good friend and flat-mate, or the lead singer in my band, for example. For one reason or another there are quite a few examples in the book where I either meet someone for the first time or mention an acquaintance who has since become a good friend and/or a bit part of my life. It's as if 2009 was a year of seed planting and corners approached, but not turned.

Another way of looking at it is that 2009 was in fact not any different from any other year and that the simple act of documenting the year highlighted all the details in the passing of time otherwise lost.

"The little things, there's nothing bigger, is there?" Vanilla Sky [2002]

You can see the whole set on flickr, or at least those photos set to 'public'.
Read more...