Back at the start of 2008 when I made my first explorations into using a series of photos in a timeline to compile a video either as stop motion or timelapse, it was quite tricky to get hold of an intervalometer for less than $200. On top of that, I was using a Panasonic Lumix point and shoot with no remote triggering option so was firmly stuck pushing the button by hand anyway.
This didn't stop me from making timelapse videos, they were just shakey from all the interruptions of pushing the button by hand and the speed of the motion would change and drift as my fingers froze over time and I found it almost impossible to maintain a regular interval between pictures.
Fast forward to the start of 2009 when I acquired a Canon 450D and my options became many for accurate interval shooting to create better timelapse videos.
Another huge benefit to using a digital-SLR camera is that you can leave it in full manual mode (everything: ISO, shutter speed, aperture, focus, no image stabalisation) so the look of the finished video remains consistent and flicker free.
As mentioned above, at the start of 2009 intervalometers were very expensive and only came with connections for the more pricey Canon cameras. So initially I was limited to hooking my 450D up to my laptop and controlling it via the included Canon EOS utilities software. This method is really effective and gives you a nice option of saving your pictures to either the camera's SD card and/or your computer hard drive.
I made a few timelapses using this camera tethered to laptop method and got good results but there are quite a few limitations, the most obvious being that you have to have a laptop with your camera. Another consideration is the minimum interval which the Canon EOS utilities software can get down to; only 5 seconds. I'm not sure why they've imposed this, Shirly it would be easy to start at 1 second and offer 0.1 second increments? It would be great if they could also include some kind of ramping option in the interval and remote control of the shutter speed in 0.1 second increments (again, this must be fairly easy to integrate into the software?). You could start your timelapse with a shutter speed of 1/400 while the sun is shining, move down to 1/50 as the sun sets, 1/5 just after and eventually end up at 30 second shutter speeds while the stars are out.
The only intervalometer I know of that offers this kind of control is the Little Bramper which seems to get awesome results. Again, there are limitations. It's expensive, it needs an adapter to work with a camera using a micro-jack connection for it's trigger release (like the 450D) and it uses a fairly basic analogue approach, open to all sorts of interferences. To use the little bramper you must put your camera into bulb mode and the little bramper does the rest. This means that the accuracy of the shutter speed and ramping is not just down to the intervalometer but also the ability of your camera to respond instantly to it's shutter release trigger. Because of this the little bramper is reported to work better with some Canon body's than others.
Anyway, I digress. To be able to make timelapses with ease out in the field I needed my own intervalometer and leave the laptop at home. After much research I decided to build one using an adjustable timer circuit. My soldering skills are rubbish but I managed to get the whole thing together in an afternoon (should probably only take 30 minutes), the instructions were pretty shabby and the relay in the picture on the packaging is back to front.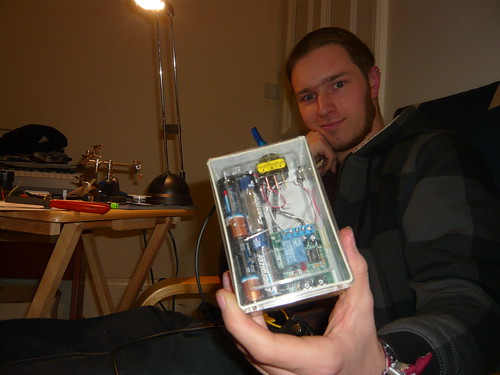
Once you've built the timer kit the only way of connecting it to anything is to stick some wires in it's two relays. You can think of these as gates, one relay lets current pass on the click, the other relay stops current from passing on the click. You want to hook your micro-jack cable up to the first relay. I used a regular mini-jack to attach to the timer kit then a mini-jack to micro-jack adapter to plug into the camera to keep things modular and flexible. This means I have the option to wire up other triggering gadgets in the future and can use the much more accessible mini-jack cable salvaged from an old pair of headphones for example.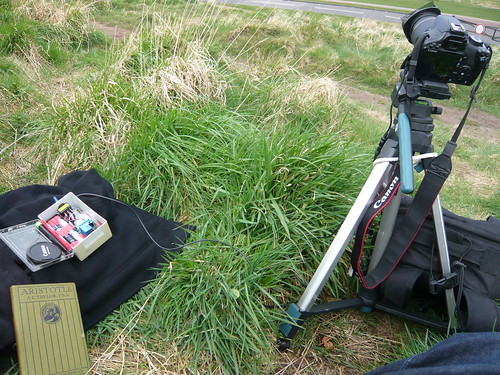
Using my DIY intervalometer out and about was great! As the circuit spends most of the time doing almost nothing the batteries last for ages, I mean like 2 weeks of use 24 hours a day. Whilst out on the side of Arthur's Seat, Edinburgh, in the cold I came across my first stumbling block. The timer kit is controlled by two tiny variable resisters, one for the interval and another for the shutter speed (if you're in bulb mode). As these are analogue they are open to interference from temperature (among other things) and so the colder they get, the slower the interval. I was fiddling about with it for ages up the side of the mountain/hill with the camera firing off shots at all kinds of speeds (in the above video Edinburgh you can see the clouds change speed in the shots from the very highest bits of the mountain/hill).
Eventually I (my Dad) figured out that this was being caused by temperature and the easiest way to get around it was to keep the intervalometer in my pocket to keep it warm. Obviously not the best method but it worked!
Sunday, 2 October 2011
Homemade intervalometer
Subscribe to:
Post Comments (Atom)
0 comments:
Post a Comment